


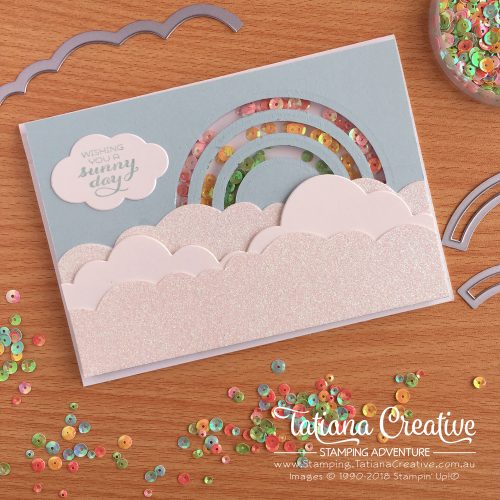
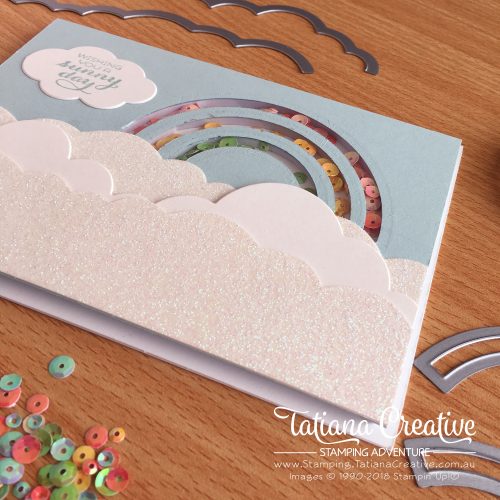
I can’t believe I’ve never made a shaker card before this! They’re so much fun!!! I see more shaker cards in my future. I was inspired by an Instagram post by concordand9th. They did a shaker card in a rainbow and I had to try for myself. I may or may not stopped housework to try out this beauty.
To create this card:
- Prepare card base in Whisper White Thick.
- Prepare card front in Soft Sky 144.5mm x 101mm
- Using the rainbow arch from the Rainbow Builder Framelits cut out three arch from the card front. TIP: I used alternative sized arch and I ran them individually through the Big Shot making sure they lined up.
- On the back of the card front add a piece of Window Sheet over the rainbow.
- Then on the back add Foam Adhesive around each arch of the rainbow, so that each window is separated. Also put Foam Adhesive to the edges of the card front.
- Find the Calypso Coral and Powder Pink sequin and put them into the top arch of the rainbow. To the middle arch add So Saffron sequin and finally to the smallest arch put the Pear Pizzazz sequin.
- Peel off all of the backing from the Foam Adhesive and carefully attach the card base to the card front. TIP: do not turn the card front over because all the sequin will fall out!! Oops.
- Add a sentiment to a cloud and cut some clouds to add to the front of the cloud in Shimmery White and Whisper White Myths & Magic Glimmer Paper.
You will certainly amaze your friends and family with this shaker rainbow card.
Thank you so much for visiting my blog! I hope today’s project has inspired you to get creative and try something new.
Until next time,
Tatiana
- Join Stampin’ Up!® to start getting your products at 20% discount: CLICK HERE
- Request a Catalogue to see what products you can purchase: CLICK HERE
- Subscribe to my newsletter to keep up to date with the latest news: CLICK HERE
- Follow me on Facebook for regular updates and inspiration: CLICK HERE
- Go SHOPPING for clearance items and specials: CLICK HERE
If you’re in Australia, you can shop Stampin’ Up!® products through my online store. I’d love to be your demonstrator and help you find the perfect supplies for your next creative project!
Supplies:
You can purchase the of the supplies I used in this project. Please click on the image below to purchase. Thank you for your support.


$14.00


$14.00
")


$14.00

$159.00