


Hello everybody!
Welcome to my blog! Today I’m blog hopping with a group of Independent Stampin’ Up!® Demonstrators, who like I, are taking part in Bruno and Kylie’s training. This training to to learn how to be a better demonstrator and how to grow our crafty businesses. I honestly do not know where I would be right now if I wasn’t part of this training. I have learnt so much over the years. As a result of this training I love to make cards to send to my customers as an appreciation for shopping their craft supplies with me. This is the card I created for customers who shopped with me in May:
[Want to recreate this project? You’ll find all the supplies I used at the end of this post, conveniently linked to my Stampin’ Up! online store. I’d love to be your demonstrator and appreciate your support—it means the world to me on this creative journey!]
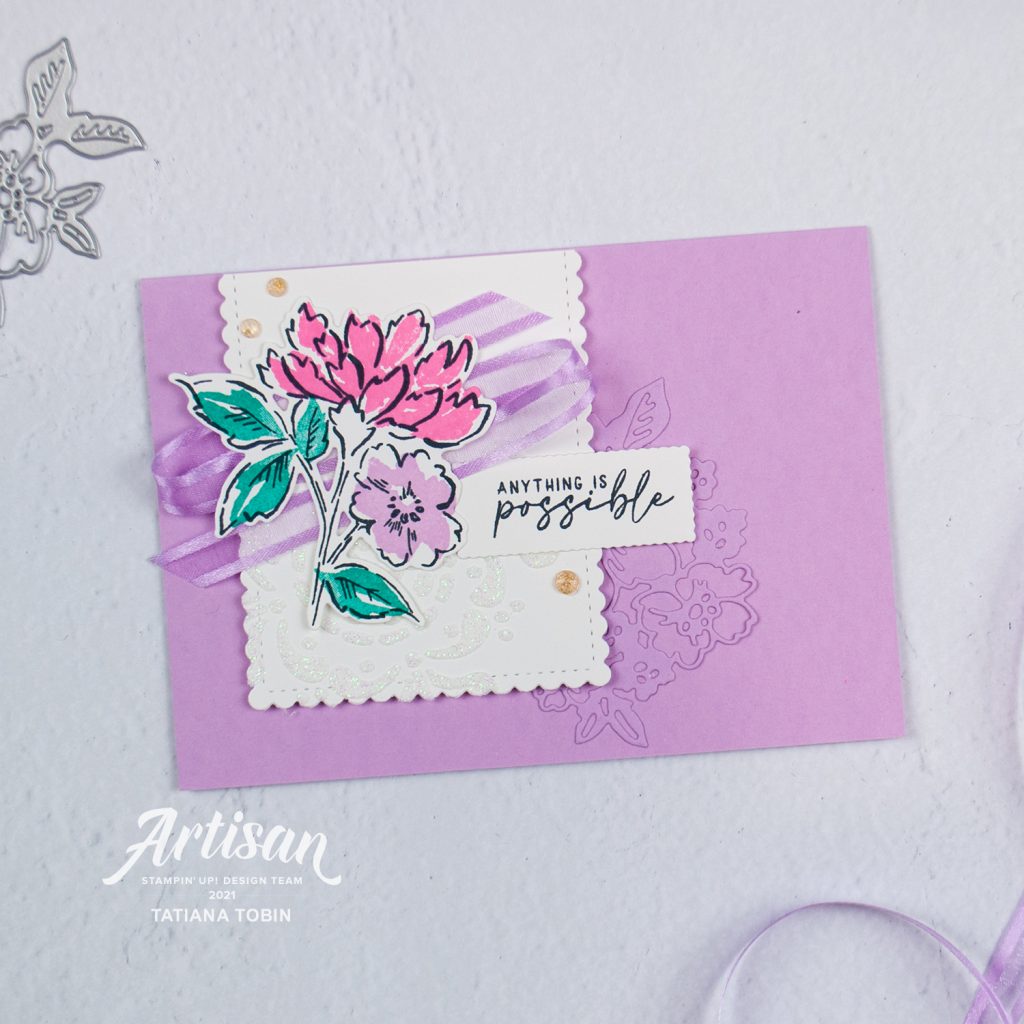
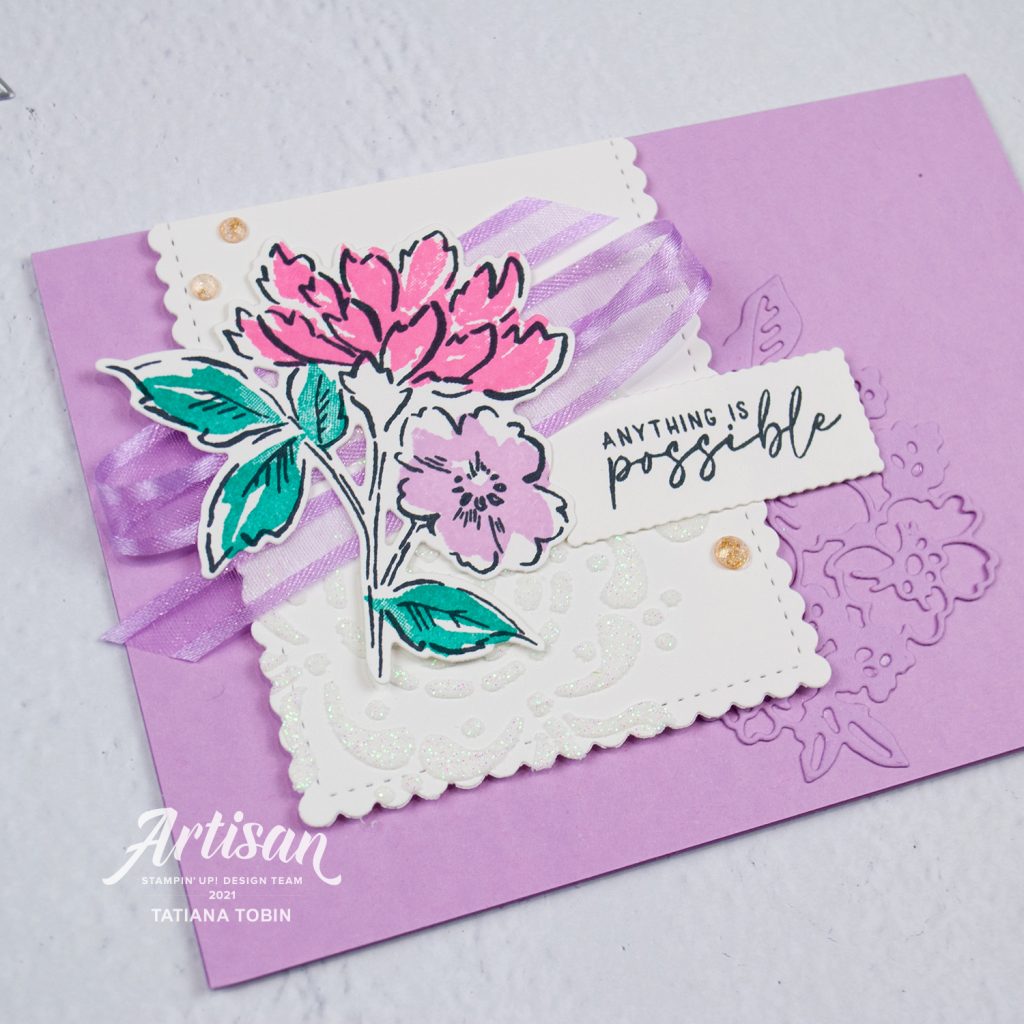
Card Details:
- Card Base: Fresh Freesia (top fold landscape)
- Card Front: Basic White die cut using largest scalloped rectangle from Stitched So Sweetly Dies
- Sentiment Label: Basic White die cut using Messages Dies
- Trim the top of the scalloped rectangle by cutting off the first three scallops. Using the Plenty Of Patterns Decorative Masks and Shimmery White Embossing Paste decorate. Use a Palette Knife to add the embossing paste.
- On some spare Basic White stamp the floral image in Memento Ink and then colour the flowers by stamping in. These have been designed to be a bit abstract and not to fit exactly. Die cut out.
- Die cut the intricate flowers from Fresh Freesia cardstock. TIP: add some Adhesive Sheets to the back before die cutting to make the assembly easy.
- Stamp the sentiment onto the die cut, it’s super easy to position because the stamp set is photopolymer.
- To assemble:
- add a piece of Tear & Tape on the Basic White panel and then layer the ribbon over it. You can reposition the ribbon till you are happy
- add the die cut flowers over the top
- adhere the intricate flower die cut to the card base and then overlap over it the Basic White panel using Stampin’ Dimensionals for interest.
- add the sentiment.
- To finish add some of the clear/gold Genial Gems

I like to say that no card is complete till you’ve decorated the envelope and the inside. I stamped the same flower onto the inside and the envelope. I stamped, coloured & die cut some extra flowers to add onto my customer gift. I like to show my appreciation to my customers with a small different gift each month. In May 2021 it was a pack of Genial Gems.
You could get a card & small gift from me when you shop from me. The supplies for this project are displayed at the end of this blog post and are linked to my online store where you can shop 24/7. If you don’t have a demonstrator, and you are in Australia, I would LOVE to be your Stampin’ Up!® demonstrator.
Please do hop over and see what other demonstrator have created for their customers:
Thank you so much for visiting my blog! I hope today’s project has inspired you to get creative and try something new.
Until next time,
Tatiana
- Join Stampin’ Up!® to start getting your products at 20% discount: CLICK HERE
- Request a Catalogue to see what products you can purchase: CLICK HERE
- Subscribe to my newsletter to keep up to date with the latest news: CLICK HERE
- Follow me on Facebook for regular updates and inspiration: CLICK HERE
- Go SHOPPING for clearance items and specials: CLICK HERE
If you’re in Australia, you can shop Stampin’ Up!® products through my online store. I’d love to be your demonstrator and help you find the perfect supplies for your next creative project!
Supplies:
You can purchase the of the supplies I used in this project. Please click on the image below to purchase. Thank you for your support.
")


 Open Weave Ribbon")


Super neat card! I love the tone on tone die cut with card base, I love the cut scalloped rectangle, super great ideas here. Thx so much for sharing and inspiring!
Thanks Lesley
Such a pretty card, love all the details! Thanks for sharing! – Ann
My pleasure Ann
Very pretty! Thanks for sharing!
Beautiful card!
Pretty card. Thank you for sharing
Gorgeous card Tatiana, love how you have used the scalloped rectangle x
Very pretty card, Tatiana! I loved the use of the mask, it’s inspired me to pull mine out of my stash.
Thanks Mary Ann! It makes me so happy to hear that I’ve inspired you to use your masks! Happy creating!
I love this color combination!! lovely card!
Thank you so much!
Beautiful Card!