


Hello everybody! Welcome to my blog!
I honestly cannot believe that its basically past mid December already! Where did this year fly?

Today I’m blog hopping with some wonderful demonstrator friends from Kylie’s Demonstrator Training. Together we learn about running a Stampin’ Up!® business. We have talks from other demonstrators who have achieved some huge goals and are successful in doing what they love.
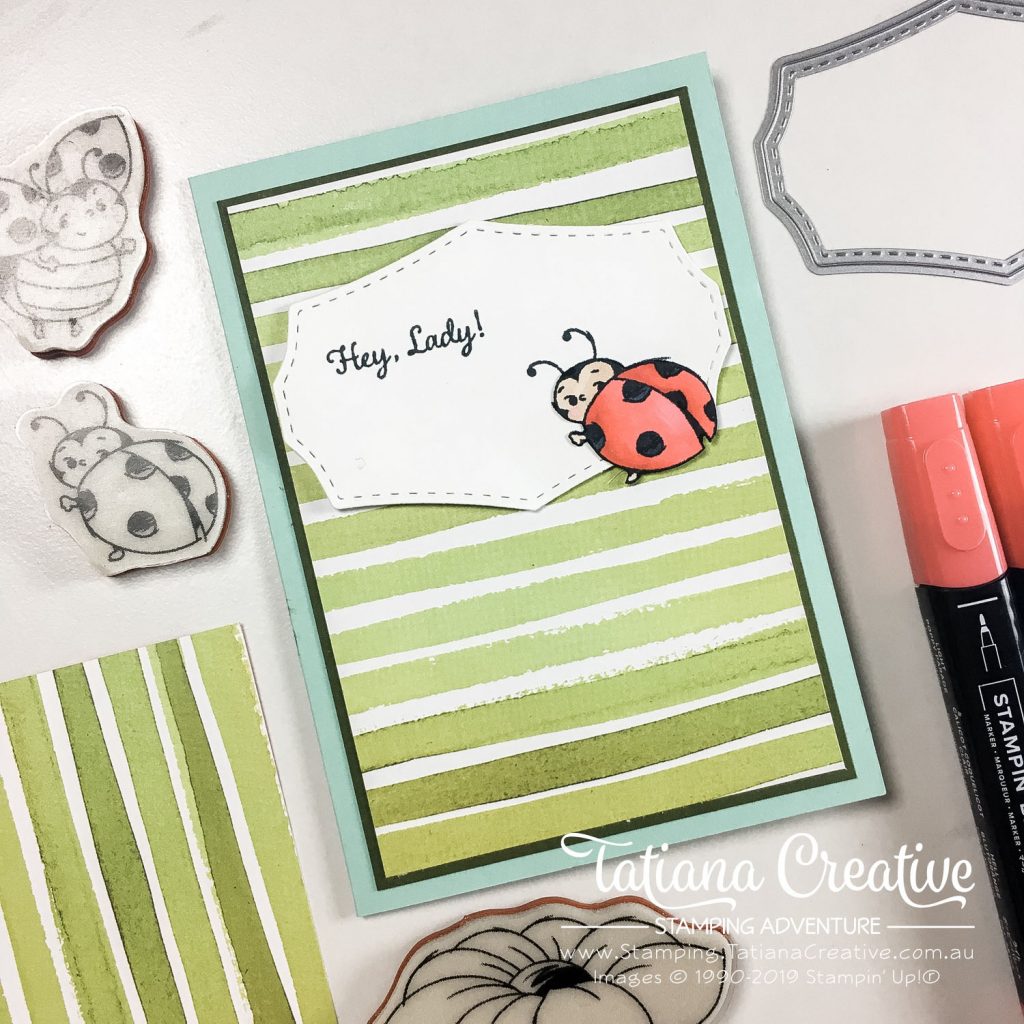
One of my favourite parts about being a demonstrator (apart from inspiring people to explore their creative side) is getting access to new products before they are on sale for customers. My absolute favourite stamp set coming up from the Sale-A-Bration brochure is the Little Ladybug Hostess stamp set – you can earn one for FREE from 3rd January 2020 till 31st March 2020!!!!!
[Want to recreate this project? You’ll find all the supplies I used at the end of this post, conveniently linked to my Stampin’ Up! online store. I’d love to be your demonstrator and appreciate your support—it means the world to me on this creative journey!]
I had a LOT of fun colouring the fun pictures of little ladybugs from this stamp set. I used my favourite colouring method – Stampin’ Blends. The results are always fantastic. Though the real magic of this card is not the card front, but what’s on the inside. I was recently inspired by Jennifer McGuire Surprise Spinner Cards video and just HAD to make one myself!
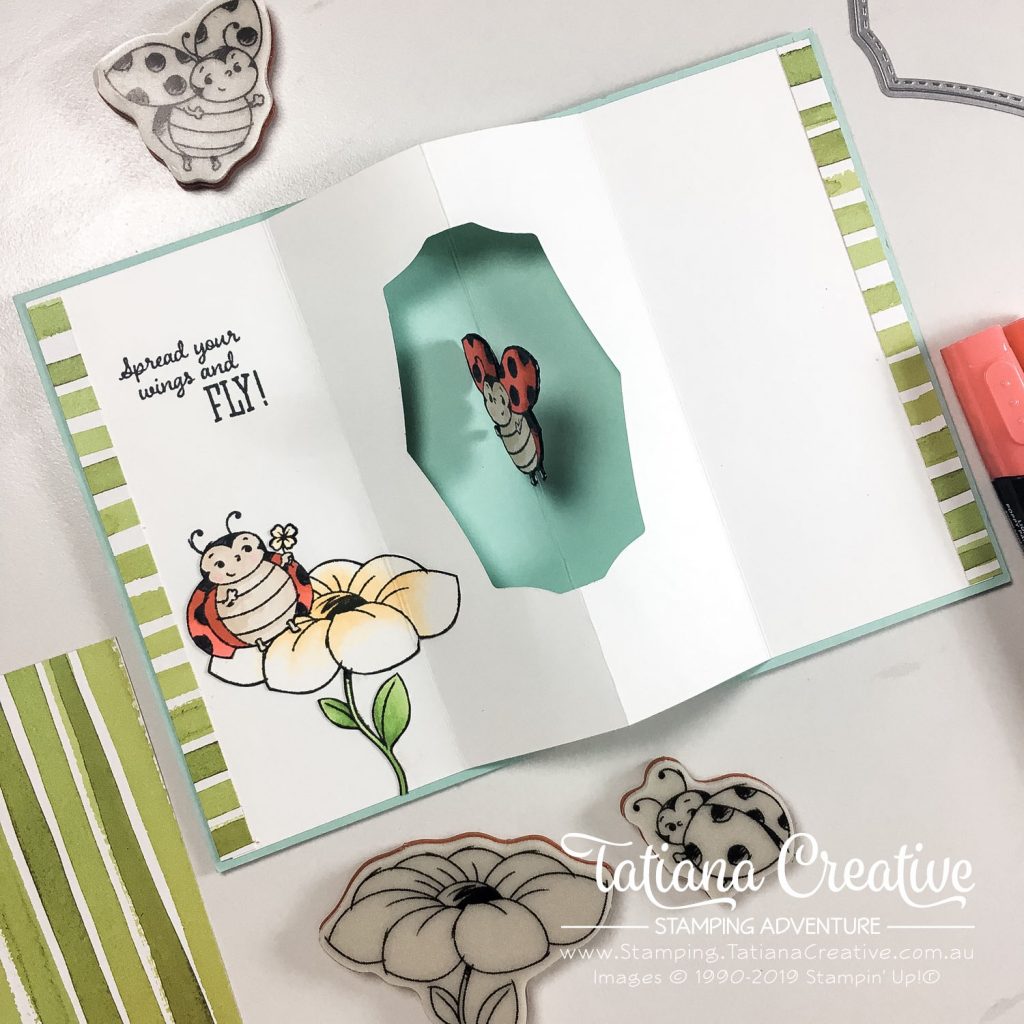
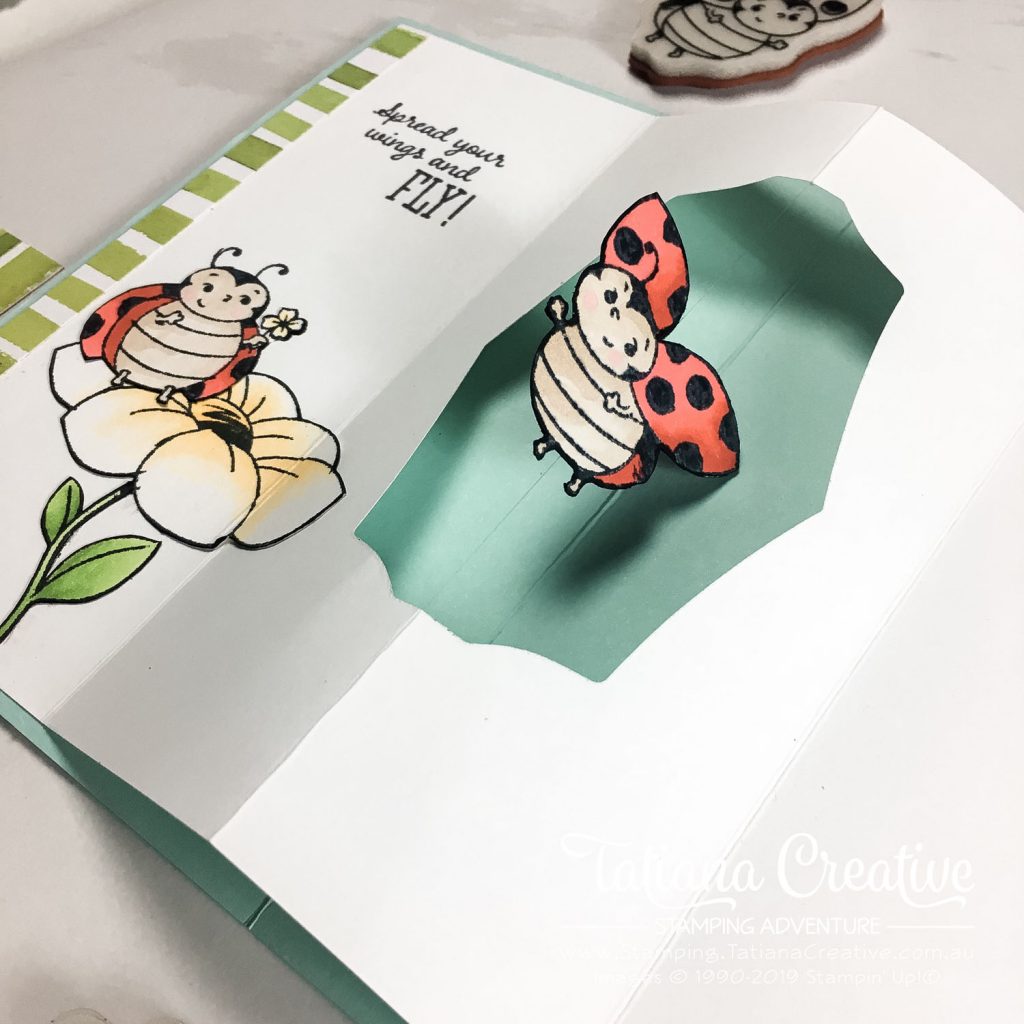
When you open my card you will see a flying Ladybug in the middle. She spins for you and does a little dance. The stamp set even had the PERFECT sentiment to go with this – “Spread your wings and FLY!”
Card Details:
- Card Base: Pool Party.
- Card Front: Mossy Meadow (9.5 x 13.8 cm) and Peaceful Poppies DSP (9.1 x 13.4 cm) and a Whisper White label using the Wild Rose Die.
- Card Insert: Whisper White (21 x 14.4 cm) (not thick) scored in the middle and then 6 cm from each side. Die cut from the middle the label from the Wild Rose Die
- TIP: if you are very accurate you can die cut the label from the card insert BEFORE scoring and use that piece for the front of the card.
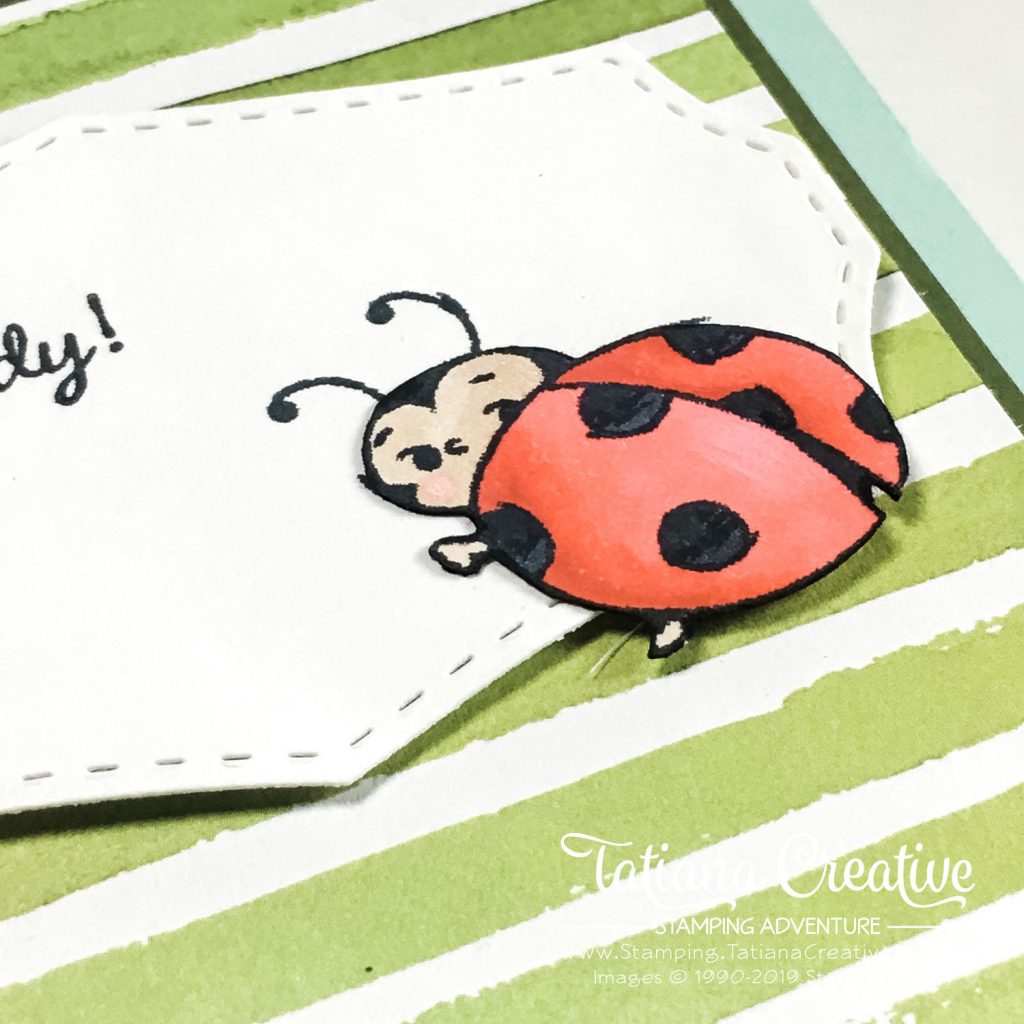
- To create the flying ladybug you need to stamp the image twice onto Whisper White Thick card stock. Once in the regular way and once so that it is a mirror image.
- Mirror Image Stamping: For this you do need the Stamparatus and Silicone Craft Sheet. Stamp the image onto the Silicone Craft Sheet and repeat a few times inking the stamp up each time. Then carefully place a piece of card stock on top and close the Stamparatus. Press onto the stamp and then you’ll get the mirror image on the cardstock.
- Colour the stamped images – I also had a few other ladybugs and the flower.
- Fussy cut the images on the black line, then go over the cut edges with the Basic Black Stampin’ Write Marker. This will over any white areas that you may have missed and creates a look of these were professional die cuts.
- Before adhering together the mirror image ladybug add some black to the back of the stamped images using the Basic Black Stampin’ Write Marker. This will hide any differences in the fussy cutting between the two. Adhere some clear thread in between the two images. Best to use Tear & Tape Adhesive for it’s strength.
- Attach the clear thread to the middle sore line on the back of the card insert with some sticky tape.
- Adhere the card insert to the card front with Tear & Tape. Start from the left side leaving a small border around the edge.
- I added strips of the DSP to the inside as well to tie together the front of the card to the inside. Plus the flower and the lady better.
- TIP: I cut off the antenna of the ladybugs and stamped the same image where I wanted to adhere the bug. The stamped image replaces the antenna.

Update: I’ve now made a video showing how I made this card. Watch it now:
How cute are those ladybugs!!!!! I just LOVE them. Please now hop along to the next blog for some fantastic inspiration from all around the world:
Thank you so much for visiting my blog! I hope today’s project has inspired you to get creative and try something new.
Until next time,
Tatiana
- Join Stampin’ Up!® to start getting your products at 20% discount: CLICK HERE
- Request a Catalogue to see what products you can purchase: CLICK HERE
- Subscribe to my newsletter to keep up to date with the latest news: CLICK HERE
- Follow me on Facebook for regular updates and inspiration: CLICK HERE
- Go SHOPPING for clearance items and specials: CLICK HERE
If you’re in Australia, you can shop Stampin’ Up!® products through my online store. I’d love to be your demonstrator and help you find the perfect supplies for your next creative project!
Supplies:
You can purchase the of the supplies I used in this project. Please click on the image below to purchase. Thank you for your support.
")


Awesome job! May I CASE? So adorable!
Thank you Laurie! Of course you may CASE. I would love to see your version!
Fantastic! Looks so good. I have just ordered that stamp set and cannot wait to use it.
Thank you Kylie! Such an adorable stamp set!!! I just love it.
Not a demonstrator, simply following the blog hop. Love what you’ve done with this card, totally not expecting the unusual inside…..Great.
Also, many thanks for the really good tip about the reverse image using the stamparatus and acetate sheet. Not heard that idea before.
Hi Vee! Thank you for hopping on by and for leaving a comment. I’m thrilled that you’ve learnt something new. Happy crafting!
Omigosh, SO adorable!!! And to think I’m waiting til January to get this stamp set?!? Guess I might need to reevaluate this decision! Thanks for the inspiration. xx
I don’t know why you would wait Angie. It is soooooooooooo cute!!! xx
This is soooo cute!
Awe! Thank you!
Wow Tatiana! This is gorgeous and amazing, I love it! Want my address so you can send it to me? hehehe, Just kidding I do love it though.
Hahaha, best reaction ever! Love that you want me to sent it to you! XXX
That card would be amazing to receive, whoever gets it is very lucky, and they better not throw it away, ever! Xo
I love this card- it is absolutely adorable!
Thank you Rhonda! It is very adorable (even if I say so myself)
Wow! Love this card will have to check out the technique suits this lady bug perfectly.
Thank you Cheryl! I’ve done a live video now showing how I made this card. Will add it to the blog post soon.
Gorgeous card Tania! It is such a cute stamp set, definitely a must have! Mine arrived today and I haven’t had a chance to play with it yet, but may have to use your for inspiration!!
Thank you Deb. So glad I’ve inspired you! I had so much fun making this card!
Love, love love!!!
Thank you!!!
Great card! Those ladybugs are totes adorbs
Thank you Christy! Yes love the ladybugs!
Love the interactive inside of the card – so fun. Excited to play with this set, too!
Thank you Teri! The inside is pretty neat! Happy stamping with the Ladybugs.
Very cute card, Tatiana. I love this fancy fold and it shows off those cheeky bees perfectly. Thanks for the inspiration
Thank you Libby! My pleasure to be inspiring you!
Love the card, But I’m in the USA and I can’t figure out the centimeters in inches. Would love to make this card. Is there anyway that you could send the measurements to me in inches
From one carve maker to another
Mary Ann
Hi Mary Ann,
If I were to translate the cm into inches your proportions would be all wrong. I’m just using started card base where it’s half a sheet of card stock (so you would use half a sheet of your standard card stock). Scoring is at the half way point. For the inside of the card it’s cut to have a boarder and I recommend 1/4″ for you. I’m not particularly familiar with letter sized card stock and it is very challenging for me to work it all out. Happy Crafting