


Hello everybody!
Welcome to my blog. This morning I’m blog hopping with the 3rd Thursday Blog Hop team (on a Friday here down under). This month’s theme is introducing the new August – December 2020 Mini Catalogue. When I first saw this catalogue I immediately fell in love with the Poinsettia Petals stamp set. It is so pretty and there’s just so many options on how to create with this stamp set particularly when you combine it with the coordinating Poinsettia Dies. That’s pretty much the reason why I’ve chosen to use this bundle for today’s blog. My card was inspired by an Instagram post I saw of Candice Fisher. I loved the blended background she made with the elements on top. Here is my version:

[Want to recreate this project? You’ll find all the supplies I used at the end of this post, conveniently linked to my Stampin’ Up! online store. I’d love to be your demonstrator and appreciate your support—it means the world to me on this creative journey!]
Slimline cards seem to be the rage at the moment on Instagram so I thought I’d make one too. I’ve made one before, just once, and thought now would be a great time to try again. I do wish though that Stampin’ Up!® had the DL envelopes for it as putting it in one that I have at home which is so not as nice as the Stampin’ Up!® envelopes. When you make a card it’s lovely to have a lovely envelope to go with it too.
Card Details:
- Card Base: Whisper White Thick (19.8 x 21 cm scored at 9.9 cm)
- Card Front: Whisper White Thick (5.5 x 21 cm & 1.5 x 21 cm) plus Shimmery White panel for blending (4 x 21 cm)
- Start by blending colours onto the Shimmery White panel. I did a big piece and cut it down.
- Using a Sponge Brayer and starting with the lightest colour brayer the colour on and then move onto the next colour.
- Blend the junction between the two colours with the lighter colour before moving onto the next colour
- I used: Pumpkin Pie, Poppy Parade, Real Red & Cherry Cobbler
- Once blended take some water and splash and drip it onto the cardstock. Let sit for a min and then blot with a tissue. TIP: longer you let the water sit the more of the colour gets “lifted”.
- Gold heat emboss the poinsettia petals (4 small and 2 medium) onto Whisper White. Die cut and combine to create three poinsettias.
- Add the blended panel to the card base then adhere the Whisper White panels using Stampin’ Dimensionals.
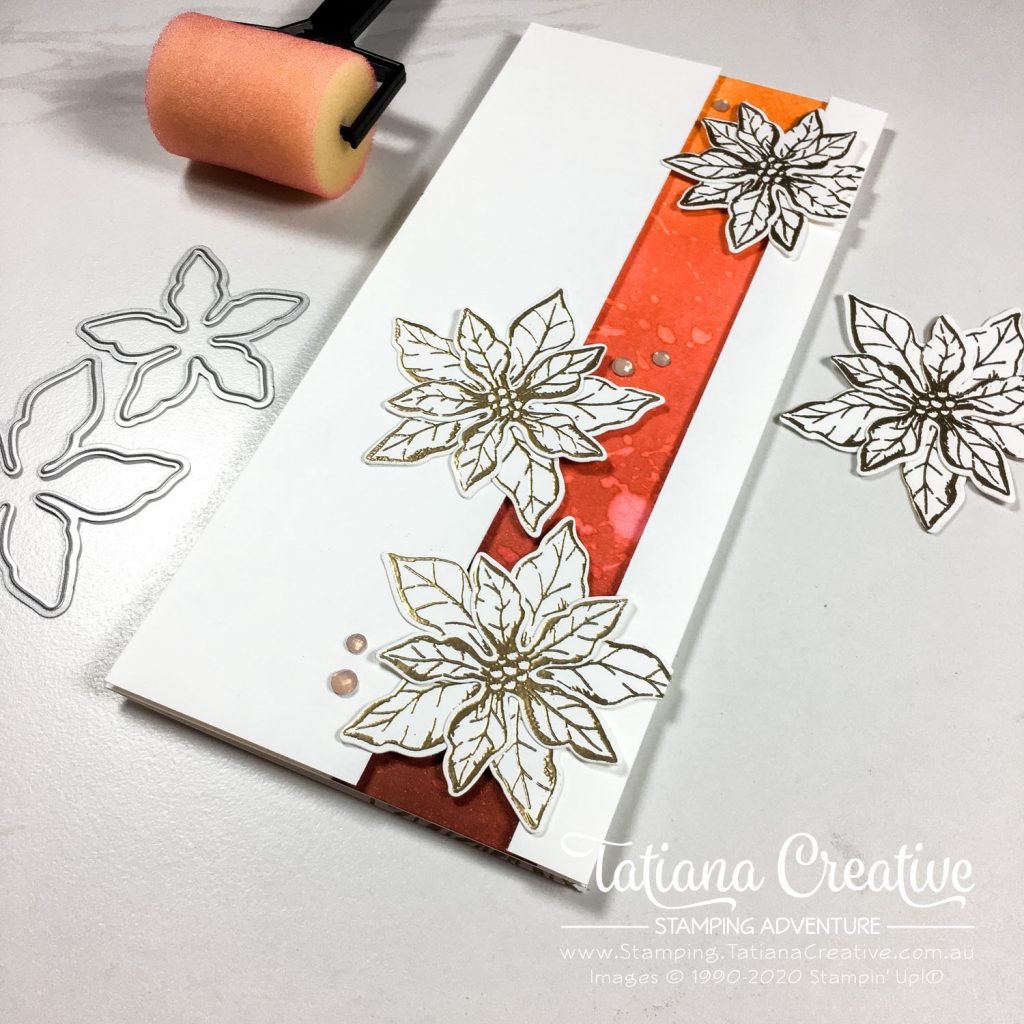
Pumpkin Pie isn’t a traditional Christmas colour but I thought it worked well with the reds and gave the card a little more colour. I places the larger poinsettias towards the bottom because visually they are heavier. I love how they go over the blended panel and almost “float” there. To finish it off I added a few Elegant Faceted Gems. These gems are adhesive backs for super easy adherence. I used the Petal Pink ones only and feel that they work really well with the water splashes on the blended panel.
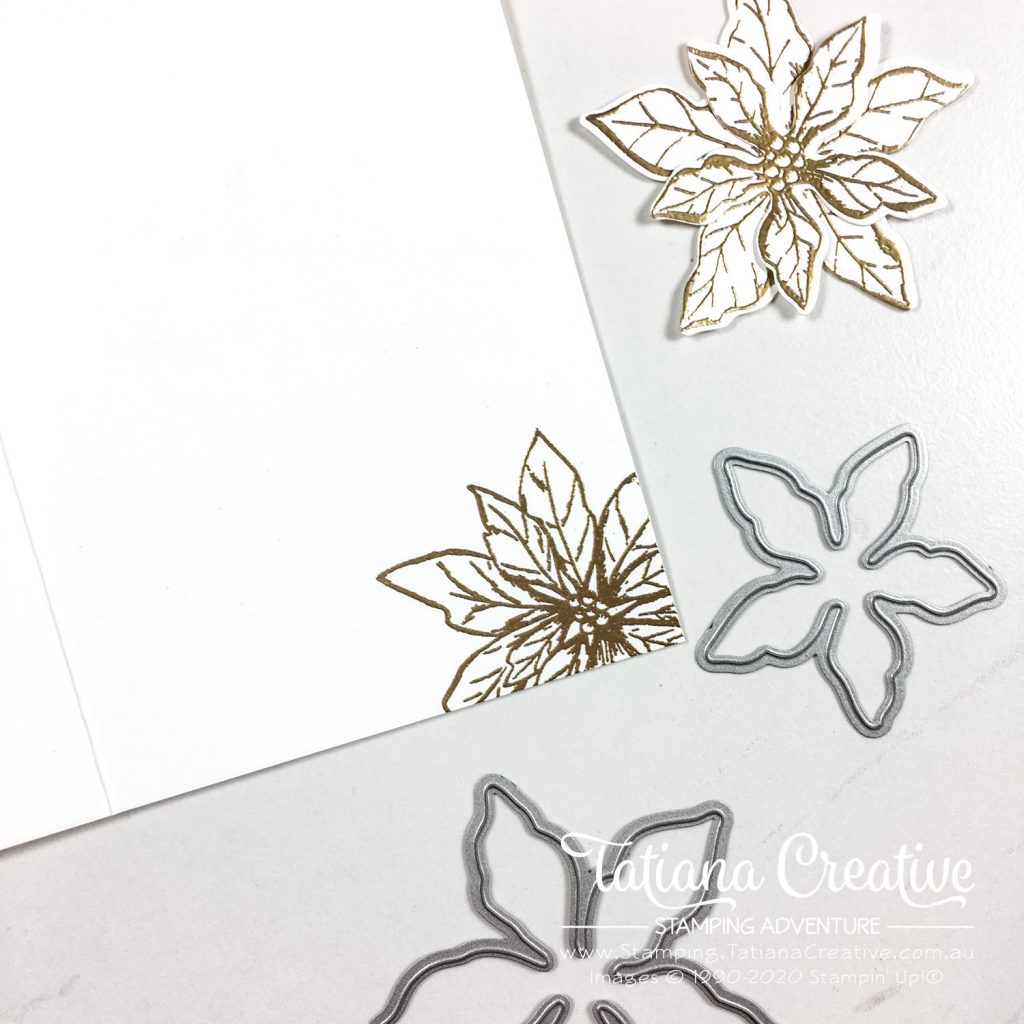
I finished off the card quite simply by Gold Heat Embossing a poinsettia on the corner of the card. I decided not to add a sentiment so that this card can be used for any occasion. It does have a Christmas feel to it but isn’t strictly Christmas.
Next up on this blog hop we have Susan. I’m really looking what Susan has to share with us all.

Full Blog List:
Kimberley Morris
Jan Musselman
Tatiana Tobin <— You are here!
Susan Webster
Susan Legits
Anne Marie Hile
Angie McKenzie
Andrea Tracy-Tucker
Kim Fee
Thank you so much for visiting my blog! I hope today’s project has inspired you to get creative and try something new.
Until next time,
Tatiana
- Join Stampin’ Up!® to start getting your products at 20% discount: CLICK HERE
- Request a Catalogue to see what products you can purchase: CLICK HERE
- Subscribe to my newsletter to keep up to date with the latest news: CLICK HERE
- Follow me on Facebook for regular updates and inspiration: CLICK HERE
- Go SHOPPING for clearance items and specials: CLICK HERE
If you’re in Australia, you can shop Stampin’ Up!® products through my online store. I’d love to be your demonstrator and help you find the perfect supplies for your next creative project!
Supplies:
You can purchase the of the supplies I used in this project. Please click on the image below to purchase. Thank you for your support.
")

")


Pingback: Holiday Debut - Susan Legits, Stampin' Up! Demonstrator
What a stunning card, I am sooo going to case this, I love the colours you have chosen X
Awe!! Thank you Kim!
Lovely layout and colored panel. Thanks so much for sharing your creation.
Thank you Susan!
Absolutely beautiful! I really like the Slimline Card format. It’s different.
Thanks Jan! The slimline is something different. Just need nice envelopes for it now.
So pretty! I love the ombre peek-a-boo panel! Thanks for sharing
Such a gorgeous card and I just love how rich those colors look against the clean design. Fabulous slimline card! Wow!
Love the layering that you did with this lovely slim line card. Definitely a fun technique.